<body><script type="text/javascript"> function setAttributeOnload(object, attribute, val) { if(window.addEventListener) { window.addEventListener('load', function(){ object[attribute] = val; }, false); } else { window.attachEvent('onload', function(){ object[attribute] = val; }); } } </script> <div id="navbar-iframe-container"></div> <script type="text/javascript" src="https://apis.google.com/js/platform.js"></script> <script type="text/javascript"> gapi.load("gapi.iframes:gapi.iframes.style.bubble", function() { if (gapi.iframes && gapi.iframes.getContext) { gapi.iframes.getContext().openChild({ url: 'https://www.blogger.com/navbar/8246297698196780869?origin\x3dhttp://tent-clearancezqiwbdfjlon.blogspot.com', where: document.getElementById("navbar-iframe-container"), id: "navbar-iframe" }); } }); </script>

Saturday, May 17, 2008

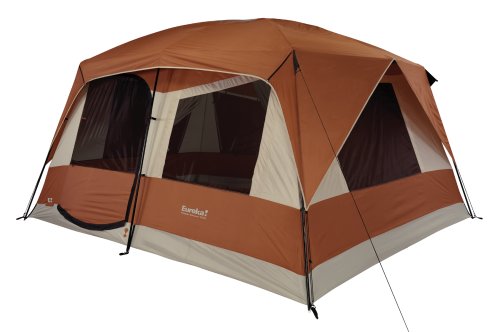
Eureka! Copper Canyon 1312 Eight-Person 13- by 12-Foot Family Tent

Featuring vertical walls for maximal internal space, this 13-foot x 12-foot (156 square feet) freestanding cabin-style tent accommodates up to eight campers on cots. The tent includes a removable curtain so it can be divided into two rooms as well as being configured as a single room. Two D-shaped doors with side flaps permit private entry into each room and have large #8 zippers with covers for durability and rain protection. Six large zippered mesh windows open for visibility and airflow and close for privacy. Toggles keep window flaps off the floor and out of the way. A detachable awning shades the front. A fly with clear-panel skylights permits stargazing and includes pockets for storing storm guyouts when not in use. A port allows an extension cord (not included) to be run into the tent. A sweep-out point facilitates housekeeping. A hanging gear-loft supplies convenient storage.

Made of 1200mm, 75D polyester, the tent has nine steel and fiberglass poles that slip into sleeves during setup. Frame clips and ring-and-pin assemblies also facilitate setup. Mesh screens out insects as small as no-see-ums. The tent weighs 37 pounds and has a center height of 7-foot-3.

Eureka! tents' standard design features include bathtub-style floors that wrap up the sides to keep water out; nickel sliders and self-healing zippers; and factory-taped major seams to seal out weather.

Key Details:

    The spacious Copper Canyon 1312 tent offers 156 square feet of room for sleeping and storage.
  • Floor Size: 13 x 12 feet
  • Pack Size: 10 x 28 inches
  • Center Height: 7' 3"
  • Minimum Weight: 37 pounds
  • Tent Area: 156 square feet
  • Seasons: 3
  • Sleeps: 5-6
  • Doors: 2
  • Windows: 6
  • Wall Fabric: 75D polyester taffeta, 1200 mm
  • Fly Fabric: 75D StormShield polyester, 1200 mm
  • Floor Fabric: 75D polyester taffeta, 1200 mm
  • Mesh Fabric: 68D no-see-um
  • Frame: 12.65 mm fiberglass and 19.5 mm steel

About Eureka!
Though the exact year is unknown, Eureka's long history begins prior to 1895 in Binghamton, New York, where the company still resides today. Then known as the Eureka Tent & Awning Company, its first wares were canvas products--most notably, Conestoga wagon covers and horse blankets for nineteenth century American frontiersmen--as well as American flags, store awnings, and camping tents.

The company increased production of its custom canvas products locally throughout the 1930s and during the 1940 and even fabricated and erected the IBM "tent cities" just outside Binghamton. The seven acres of tents housed thousands of IBM salesmen during the company's annual stockholders meeting, which had since outgrown its previous locale. In the 1940s, with the advent of World War II and the increased demand for hospital ward tents, Eureka expanded operations and began shipping tents worldwide. Ultimately, upon the post-war return of the GIs and the resultant housing shortage, Eureka turned its attention to the home front during the 1950s by supplying awnings for the multitude of mobile homes that were purchased.

In 1960, Eureka's new and innovative Draw-Tite tent, with its practical, free standing external frame, was used in a Himalayan Expedition to Nepal by world renowned Sir Edmund Hillary, the first person documented to summit Mt. Everest only six years earlier. In 1963, Eureka made history during its own Mt. Everest ascent, with more than 60 of its tents sheltering participants from fierce 60+ mph winds and temperatures reaching below -20°F during the first all American Mt. Everest Expedition.

For backpackers and families, Eureka introduced its legendary Timberline tent in the 1970s. Truly the first StormShield design, this completely self-supporting and lightweight backpacking tent became one of the most popular tents the entire industry with sales reaching over 1 million by its ten year anniversary.

Eureka tents have also traveled as part of several historic expeditions, including the American Women's Himalayan Expedition to Annapurna I in 1978 and the first Mt. Everest ascents by a Canadian and American woman in 1986 and 1988. In recent history, tents specially designed and donated by Eureka sheltered Eric Simonson and his team on two historic research expeditions to Mount Everest, this time in a quest for truth regarding the 1924 attempted summit of early English explorers George Mallory and Andrew Irvine. During the 1999 expedition, the team made history finding the remains of George Mallory, but the complete mystery remained unsolved. Returning in 2001 to search for more clues, the team found amazing historical artifacts which are now on display at the Smithsonian.

Amazon.com Tent Guide
Selecting a Tent
Fortunately, there are all kinds of tents for weekend car campers, Everest expeditions, and everything in-between. Here are a few things to keep in mind:

Expect the Worst
In general, it's wise to choose a tent that's designed to withstand the worst possible conditions you think you'll face. For instance, if you're a summer car camper in a region where weather is predictable, an inexpensive family or all purpose tent will likely do the trick--especially if a vehicle is nearby and you can make a mad dash for safety when bad weather swoops in! If you're a backpacker, alpine climber or bike explorer, or if you like to car camp in all seasons, you'll want to take something designed to handle more adversity.

Three- and Four-Season Tents
For summer, early fall and late spring outings, choose a three-season tent. At minimum, a quality three season tent will have lightweight aluminum poles, a reinforced floor, durable stitching, and a quality rain-fly. Some three-season tents offer more open-air netting and are more specifically designed for summer backpacking and other activities. Many premium tents will feature pre-sealed, taped seams and a silicone-impregnated rain-fly for enhanced waterproofness.

For winter camping or alpine travel, go with a four season model. Because they typically feature more durable fabric coatings, as well as more poles, four-season tents are designed to handle heavy snowfall and high winds without collapsing. Of course, four-season tents exact a weight penalty of about 10 to 20 percent in trade for their strength and durability. They also tend to be more expensive.

Domes and Tunnels
Tents are broadly categorized into two types, freestanding, which can stand up on their own, and those that must be staked down in order to stand upright. Freestanding tents often incorporate a dome-shaped design, and most four-season tents are constructed this way because a dome leaves no flat spots on the outer surface where snow can collect. Domes are also inherently stronger than any other design. Meanwhile, many three-season models employ a modified dome configuration called a tunnel. These are still freestanding, but they require fewer poles than a dome, use less fabric, and typically have a rectangular floor-plan that offers less storage space than a dome configuration. Many one and two-person tents are not freestanding, but they make up for it by being more lightweight. Because they use fewer poles, they can also be quicker to set up than a dome.

Size Matters
Ask yourself how many people you'd like to fit in your fabric hotel now and in the future. For soloists and minimalists, check out one-person tents. If you're a mega-minimalist, or if you have your eye on doing some big wall climbs, a waterproof-breathable bivy sack is the ticket. Some bivy sacks feature poles and stake points to give you a little more breathing room. Also, if you don't need bug protection and you want to save weight, check out open-air shelters.

Families who plan on car camping in good weather can choose from a wide range of jumbo-sized tents that will accommodate all your little ones with room to spare. A wide range of capacities is also available for three- and four-season backpacking and expedition tents. Remember, though, the bigger the tent you buy, the heavier it will be, although it's easy to break up the tent components among several people in your group. It's also helpful to compare the volume and floor-space measurements of models you're considering.


Customer Review: Love this tent!
Also am new to the 'family' tenting vacation. Have done a lot of tent camping as a single person many many years ago so this is a new experience for me. As with many of the other reviewers, I based my decision on online research and other reviewers opinions. Took the plunge with this tent and 'so far' couldn't be happier. We did as most people recommended, read the instructions first, then pulled everything out of the box and sorted the poles then started assembling. From the time it took us to lay out the bungy poles to finally pegging down the tent it took a maximum of 20 mins for husband to have it up (with the help of our little 5 yr old). Will definately be able to set it up faster second time around (and with out the help of our little one :-). Definately am glad that we did not try it for the first time in the dark but am sure if you are used to putting up large tents it wouldn't be a problem, very easy. Slept in it for the one night and just LOVED the open screened roof. Gave a fantastic uninterrupted view of the stars. Don't know what it is like in wind and a bad rain storm but so far we are very happy with our purchase and can't wait to go camping in it.
Customer Review: Great tent
We set up the the tent in the rain, very easy set up. There was an all night down pour, not a drop of rain in the tent, is was very cold at night used coleman heater to stay warm, because of the size of the tent two heaters were needed. Did O.k. trying to stay warm.. I would recommend this tent to anyone looking for a cabin style (big) tent.


Canvas, a woven plain fabric is an important accessory in the field of painting. Beside paintings, it is used for making tents, sails, backpacks and marquees. The word is derived from the Arabic word "cannabis". It is known for its sturdiness and durability and can be used in making shoes and handbags. Thus, it has multiple uses and it has become an essential thing in various aspects.

Canvas a Base for Painting:

The most conventional use of canvas is painting. This is said to be the most reliable base for oil painting. Before an oil painting is done on the canvas, it is coated. This coating actually prevents the oil paints from coming in contact with the fibers. On most of the occasions, this coating is done by synthetic latex. Traditionally, it used to be made by the linen fibers. However, it is in 20th century that cotton ones came into the picture. It was known as cotton bucks. Modern painters use cotton stretch canvas. Cotton ones are usually lighter than other cotton fabrics like denim.

They are available in two types - plain and duck. The threads of the duck cotton are tightly woven. Cotton canvas is susceptible to get wrinkled. Generally, pressing warm iron over the wet surface of cotton canvas is done to flatten the surface. Readymade sheets are also available in the market in various sizes.

Oil painting is quite a popular genre of painting. On canvas, the colors of painting emerge more brightly.

For more information please visit Ethnic Paintings.

Rajneesh Dubey is Content Coordinator for http://ethnicpaintings.com This website gives you comprehensive informations on painting history, development, trends, popular painting styles, great painters, famous paintings, painting galleries and museums, painting tips, painting classes. In other words, this website is a treat to painting freaks.

Coleman Tent Kit

Nesting wisk and dustpan Tent stake puller Rubber tent peg mallet (4) 10" steel tent pegs Breathable mesh storage bag
Customer Review: CHEAP BUT WOW WHAT A DEAL!!!
WHAT CAN I SAY CHEAP IN A GOOD WAY FOR PRICE AND ITS ALREADY TO GO SWEETNESS COMES TO PEOPLE WHO WAIT
Customer Review: Good thing to have
This kit is a good thing to have. Everything works perfect an have its utility. The brush could be bigger but besides that is an execellnet tool.


The beginning of April, I took Jen, a friend that I met while hiking the PCT last year, and her friend, Katie on one of my favorite hikes in the Cotahuasi Canyon area. I picked them up at the airport in Arequipa on Wednesday morning at about 7:00 and we left directly for Cotahuasi. It was a beautiful sunny morning in Arequipa, as usual, so I was hoping we would get a good view of the mountains on our way. The first part of the trip is on the Pan American Highway, which passes through the desert most of the time. After about and hour and 45 minutes, we left the Pan American and headed down into the Majes Valley. Here the road passes through a green valley, along side of the Majes River. The main crop there is rice, but there is also some corn and sugarcane. We had dropped down from about 8,000 feet at Arequipa, to just over 2,000 feet in the valley, so it was also nice and warm. About an hour later, we started the climb up to Chuquibamba, and were again back in desert conditions, except where there was irrigation.

Chuquibamba is at about 8,500 feet and sits on a ledge, at the base of the steep cliffs below the high plain. It is also the end of the paved road; from here there is a steep climb, on a rough gravel road, up to the high plains. About 45 minutes after leaving Chuquibamba, we arrived at the rim of the canyon and started across the plains. Normally this is where you get the first view of Nevado Coropuna, the highest volcano in Peru, at 21,079 feet. However this day we weren't able to see it, as the clouds had covered the mountain, as is often the case in the rainy season. We were instead greeted by a herd of llamas, and the gals were able to get some pictures of them.

I was a bit concerned about the road conditions due to the rain, and our first challenge came 45 minutes later, at the first river crossing. There is no bridge, because the river is just a wide shallow flow for nine months of the year. However during rainy season it can be a different story, as all the water comes down from the long side of Coropuna. My fears were confirmed when we got to the crossing, it was running fast, and higher than I had ever seen it before. I got out and looked at it, but couldn't really tell how deep it was. It usually rains in the afternoon so knew that it wouldn't help any to wait for it to go down, so decided to try crossing it. I chose what looked like the shallowest place and slowly started driving across. Fortunately the bottom of the river is hard and firm, we didn't hit any submerged rocks, and made it safely across.

From there our only problem was the occasional mud hole and ruts. We arrived at the base of Coropuna an hour later, finally getting a glimpse of it through the clouds. As the weather seemed to be clearing a little, we drove as close as possible, and parked just below 16,000 feet. Normally I can drive closer, but the road was soft from the rains. We hiked across a plain and started going up the rocky slope on the west end of the mountain. Despite not being used to the elevation, Jen and Katie were doing well, and we slowly made our way up to a little over 17,000 feet. It was getting time to get back on the road, as we still had a three-hour drive to Cotahuasi, so we reluctantly headed back to the car. It was a good thing we did, as it started to mist on the way, and we were getting chilly.

We had to stop once just before Cotahuasi, as Katie wasn't feeling good, not sure what the cause was, but she felt better after throwing up. We arrived in Cotahuasi just after dark; and after having a light dinner, got her and Jen checked into Hostel Chavez. We agreed to meet for breakfast at 6:15 and start our trek at about 7:00 am. When they met me in the morning, Jen said she had also gotten sick during the night, and hadn't gotten much sleep. Fortunately Katie was feeling much better. After breakfast we started hiking down the Canyon, with a goal of reaching the hot springs at Mayo, and spending the night there. Because of Jen's weak condition, we went slowly and she did OK. We did skip the side trip to Sipia Falls, to avoid the extra elevation gain coming back up, as well as to make sure we had sufficient time to get to the hot springs before dark.

We arrived there in good time, got our tents set up and then had dinner alongside of the pool. Jen and Katie were quite tired from their flights, the hiking at altitude, and their being sick, so they went to bed early. I soaked in the perfect temperature water for a while, and then went and explored a nearby trail that goes to Velinga, a village above us. Because we were down to around 5,000 feet, it was a nice warm evening, great for a night hike. In the morning, I woke up just as it was getting light, when I heard a pack train of burros going by. It was time to get up anyway, so we got up, had breakfast and packed up our tents, and got ready to continue to Quechualla, an hour and a half farther down canyon.

On the way to Quechualla, the trail goes by some extensive Wari ruins. The Wari were a pre-Inca culture, dating back about 1,000 years. We enjoyed exploring in the ruins, finding pottery pieces, and especially the bones and pieces of cloth from the burial site. Unfortunately, previous "explorers", had scattered everything all over outside of the cave, so we didn't get to see anything in its original location. After that, we took the new bridge and trail to Quechualla, while marveling at the old Inca trail clinging to the side of the canyon across the river. The bridge was just built about 5 years ago, before that time the old trail was still in use. I would love to go on the old trail, but it doesn't appear to be accessible, due to landslides that have wiped out the approach from both ends. I will have to explore more on a future trip to make sure.

After arriving in Quechualla, I went to find Julia, a woman I had met there previously. She has a couple of beds for rent (one of them being outside in a garden!), as well as to see if she could make us lunch. She was disappointed that we wouldn't be able to spend the night, but agreed to provide lunch, as well as a room to wait in. We spent some time there, eating the fresh grapes she gave us and then walked around the village and took some photos. It is a Peruvian custom to not invite guests into the kitchen to visit while preparing the meal, but in this case I knew her kitchen was also out in her courtyard, so we went there to talk to her while she was working. She soon put us to work, shelling the beans that would go into the soup. Of course we didn't know what we were doing; we thought we were all done when we had taken off the outer husk, but she showed us that there was another layer that had to be removed. There is no electricity in many of the remote villages here, so I requested vegetarian soup, not wanting to take a chance on anyone getting sick from the various meat jerkies that dry out in the open, covered with flies. The soup was delicious, with many things in it that none of us were familiar with, along with potatoes, a staple here.

Both Jen and Katie were the adventuresome sorts (Jen had also hiked the AT and climbed Kilimanjaro), so they agreed to take a new route that I hadn't been on before, on our way up to Charcana. It was a steep trail, with about 5,000 feet of elevation gain in about five hours. We had been given varying estimates of how long it would take, but when we were approaching the longest estimate, with no sign of Picha, our goal, or a way out of what looked like a box canyon, I was beginning to get a bit worried. However, we soon went around a slight curve in the canyon, and there was a small village tucked against the base of the mountain. By this time, we could also see a trail that traversed around a ridge, which we hoped was our route to Charcana in the morning. It was looking like it could rain, so I asked around and a lady told me that we could sleep in the municipal building. It is a very small village, and the municipal building was correspondingly small, but we managed to fit all three of us on the floor. The lady's young daughter entertained us for over an hour as we got settled in and made dinner, during which time she kept demanding food, so we tried to teach her a few manners like "please" and "thank you".

In the morning, after about a 45-minute hike to get water, we had breakfast and started on the trail to Charcana. It was an easy hike compared to the hike up to Picha, and we enjoyed the scenery as we traversed around the mountain, high above the Cotahuasi River. We checked into the only hostel in Charcana, and then in the afternoon, hiked up a few more thousand feet to see some ancient stone paintings, as well as going above them to the high plain looking for a natural stone arch. We never found the arch, but we talked with a few people, and I think I have the directions to find it next time. We were treated to more great views and enjoyed the hike without our backpacks, returning in time to have dinner and go to bed early, knowing that we had another hard climb ahead of us the next day.

This hike was another climb up to the high plain, this time in a different direction, heading back towards Cotahuasi. Up until now, it hadn't rained on us, but that changed as we neared the top of our 3,000-foot climb up to the top of the canyon. The light rain didn't last long, and when we reached the plain at close to 14,000 feet, it looked like it was going to clear up. This was welcome news as we had about a five hour hike, going up to 14,500 feet, before we reached the next canyon and would be able to get down to a lower, and warmer elevation to spend the night. However the weather changes very rapidly up there; and we were soon hiking in the rain again. There isn't much up there except a few hardy families of llama herders, and we soon met a group of them. There was a small building that looked like a church, which had a covered entryway. We took a long break there, and by the time we had finished our cheese and bread, the rain had stopped and it started to clear up again.

After another rainy spell, we were starting to get a bit chilly, so were very glad to reach the other side of the plain and start heading down into a side canyon above Huarhua. We had to take a big jump across what normally is a small stream on our way down; but the rain had stopped and it was getting warmer, which was very good. At least everything was lush and green from the two months of rain, and we had no problem finding water to drink. We arrived in Huarhua while it was still light, but again decided to try to find at least a covered area to set up our tents. When we asked a few young children on the street about a place to stay, they told us that all the adults were gone, they had taken their high school aged kids to Cotahuasi to get them enrolled in school and the boarding house there. We kept looking around and soon found a young man who offered us a room to stay in. He said he was also a visitor in Huarhua, here from Lima to see his father, who had an extra room we could use.

The following day we were heading out of the village on what I knew was the correct trail, when two different people told us we were going the wrong way. It finally dawned on me that because I had told them we were going to Cotahuasi, they expected us to take the trail down to the bridge, where we could meet the 11:00 am combi, and get a ride in that back up to Cotahuasi. People here have trouble understanding that we like to hike just for fun! About 30 minutes later, I wasn't sure it was going to be fun, as we had to cross a river that was cascading down in a steep canyon. I was relieved to see the bridge was still there, but soon could see that the water was covering the trail on both sides of the bridge. The bridge was in a narrow flat spot with cascades above and below, not the best situation. I led the way and show the gals how to jump across from rock to rock, without getting water in my boots. They decided that was beyond their comfort level and chose to walk through the water instead.

From there it was another climb back up to get around a steep canyon wall, and then a long steep downhill back to the bridge in the next canyon. The Cotahuasi River flows through the large Cotahuasi Canyon, but there are many smaller side canyons and rivers that feed into the Cotahuasi. We were making good time, looking forward to roast chicken for a late lunch when we got back to Cotahuasi. That must have really inspired Katie, because she set a blistering pace for the last 1 hours, and we arrived ahead of schedule. We had plenty of time to visit around Cotahuasi in the afternoon, and then drive to Luicho to enjoy a relaxing time in the hot springs there in the evening.

Our adventure wasn't quite over, as we discovered during a very muddy and slippery drive up out of Cotahuasi Canyon the next morning, during which time we were very thankful for four-wheel drive. Once on the high plain again, we came upon a large truck, blocking the road at a narrow stream crossing over a culvert. They were working on something under the cab, but the engine was still running, so I asked them if they could move enough to let us by. They said they had a fuel problem but it would be just a few minutes. That dragged out to 15 or so, and then the engine died! About that time a pickup came from the other direction, and was waiting on the other side of the truck. It was some friends of mine, so we talked about switching vehicles, but finally they got the truck running again and moved it out of our way.

Our main concern was getting Katie back to Arequipa in time for her flight to Lima in the evening, but we arrived there in plenty of time. After doing some tourist shopping, we headed off for the airport, only to find out that her flight was canceled due to foggy weather. Fortunately, they were able to book her on a flight the next day, and she only missed a day's sightseeing in Lima. I took them back to the airport in the morning, where Jen took her flight to Cusco to hike the Inca Trail to Machu Picchu, and Katie headed back to the U.S.

Vic Hanson is the founder of Adventure Cotahuasi Tours, which offers pre-planned and custom adventure travel tours in Cotahuasi Canyon and other areas of Peru. If you are interested in your own adventure in Peru, check us out!

http://www.adventurecotahuasi.com

Disney Princess Traditional Slumber Bag

This Disney Princess Slumber Bag is colorful and bright and will provide a cozy night's sleep for your little princess. It features bright, bold graphics for character fun, a side zipper for easy accessibility and 16 oz. polyester hollow fiber fill. Great for sleepovers, naptime and travel. The warm, soft tricot liner adds increased warmth and comfort and it is lightweight and portable. Take it with you wherever you go. Easy care and cleaning - machine wash and dry. Measures 30" x 57".
Customer Review: Princess
Bought this item for my granddaughter. Sure she will love it...she loves all princess stuff and had a hard time finding this is stores.
Customer Review: Great INDOOR sleeping bag
We bought this for our 4 year old and she loves it! The inside is very soft and the outside has her favorite Disney Princesses on it. It's great for sleepovers indoors. I would not recommend this as an outdoor,camping sleeping bag.


So where do you start when organizing an African safari trip?

If you have been considering one of the best holiday adventures you could possibly have but are an extreme novice to this mighty continent then the prospect can seem rather daunting.

Luckily for you, there are travel agencies which can help you with all the preparation and location details and in this article, we will present three African safari trip options to you depending on your experience.

Preparation aside, the first thing you need to decide is how long you want to spend on safari and what exactly it is you want to see. Africa is such a large continent that to attempt to see it all in one trip is impossible unless you take a one year sabbatical. Even then, the chances are you won't even experience half of what Africa has to offer.

Some of the areas to consider include South Africa, Botswana, Tanzania and Kenya and to be honest, just spending your entire vacation in one of these countries will probably be enough. The good news is though, with the African safari trips on offer, it's quite conceivable you could spend time in each one of these destinations.

Here's three safari options:

- Self-drive safaris... may not be suitable for complete novices to Africa however, a well orgainized self-drive safari would be a good choice for people travelling in a group with an experienced guide.

Self-drive safaris have the advantage of travelling at one's own pace rather than sticking to the strict schedule of an organized tour. You need to be aware though that some destinations may provide conditions which could be considered hazardous. Understanding the lay of the land, road rules and each destinations political landscape is vital.

- Mobile safaris are well organized excursions and can range in length from a few days to weeks. With an experienced guide or guides, mobile safaris are a excellent way to see the landscape in relative safety.

- Fly-in safaris suit those with limited time. One of the advantages of fly-in safaris is seeing the landscape from a wide perspective. These can range in length from four to fourteen days and in many instances, you can spread the trip out over several destinations.

If you are considering an African safari trip then get the latest preparation tips and tricks you need to know. Plus, get the latest african safari related news and reviews.